3 Awesome DIY Saw Horses
- Workshop DIY Projects
- April Wilkerson
- Updated: February 26, 2023
Thinking about building your own DIY saw horses? Check out this project where I build a variety of saw horses and walk you through each build step by step with plans!
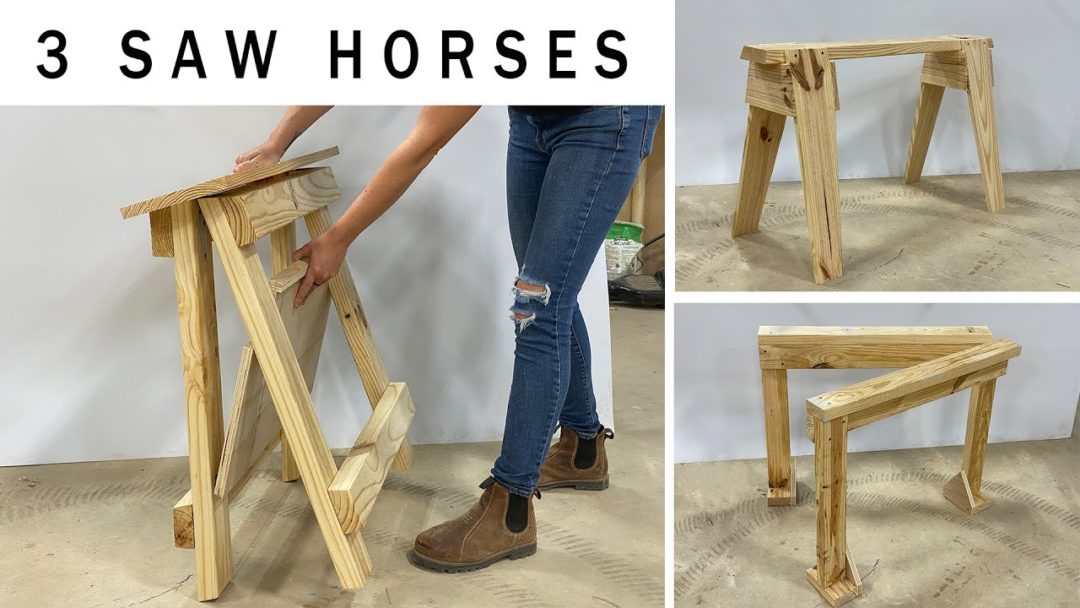
Sawhorses! So simple, but extremely useful. In this video I’m going to show you three different types that are all very quick, easy and cheap to put together. While all three can be used as a standard saw horse, they are all three made with a slightly different purpose in mind.
Let’s go ahead and get into the first design which is a folding sawhorse.


I love this one for the shop environment because once I’m done with them, I love to fold them away and store them on the wall. I placed a handle in the top board to make it easy to carry when it’s deployed or folded, then it also has a folding trey at the bottom to set tools or boxes of hardware on while working.

This design takes just a few 2x4s and a scrap piece of plywood for the tray.
If you’re interested in Sawhorse DIY Plans for any of these, I do have them available here!
After cutting all the legs and cross members, I used wood glue and brad nails to make up the two leg assemblies. If you are building these for a traveling job site and want the ability to tear them down between jobs, then skip the wood glue.
However, since I plan to always leave these together and use them in my shop, I applied Titebond Original to all the joints which really increases the overall sturdiness at the end of the build. If you skip the wood glue then use screws on these joints. However, since I’m using wood glue and it’s the true holding power, I used brad nails to clamp it until the glue cured.
Lets add on some hardware.
To make these guys foldable, I’m using a strap hinge at the top on both legs.
The main thing to pay attention to here is that both feet are flat on your work surface and that the barrel of the hinge is below surface level.
I’m using a straight edge to make sure the two top planes are in line with each other then using a pencil to mark the location of the holes. This way I can lay the saw horse on it’s side and open it up to access the inside to pre drill and mount the hinge. BTW: I’m not predrilling in cases like this to prevent splitting….it just makes running in the smaller screws easier.
I was originally planning on leaving them like this, but I didn’t like how the legs didn’t automatically stop at their correct angle, or how there was nothing preventing them from slipping out completely.
So next came in the trey. For this I recommend using whatever thickness of plywood you have scrap of. I had some 3/4” but 1/2” would also work fine. After ripping it down at the table saw, I used a speed square to guide my jigsaw and cut out the corners which will go around the 2×4 legs.
Next I changed the holding orientation in my SuperJaws so that I could attach a small front lip to the front edge. This lip will drop down over the bottom brace when the saw horses are deployed and not only make the legs stop at the correct angle every time, but also stop them from slipping open when you don’t want them to.
These are also attached with a small hinge.
Now lets add a top board that will not only expand the foot print for setting material on, but also give us material to clamp to and put in a way to carry it.
For this board you only want to attach it to the base, on one side or the horses won’t be foldable any more. I recommend countersinking these so that the head is below surface and a passing blade won’t hit it.
To make a handle, I cheat and typically tear one off a cardboard 6 pack then trace it in the center. Once I punched a hole with a drill bit, I finished the cut with a jigsaw.
And that’s it! Easy, cheap, but sturdy. You pick up the tray to start the folding action, then drop it to lock the legs into place. And you can see I actually did a jump test on these and they didn’t even budge.
Moving on to design number 2. This is another folding option but in a different direction.
These can be used for holding regular stock material but where I feel like they thrive at is large sheet items since you can adjust the angle of each horse to be as wide or narrow as you need it.
These are almost mostly made from 2x material but also has some scrap ply involved. Working off the cut list I made, I started by cutting all the parts needed for a pair. There are a lot of repeated lengths so I folded out the wings on my DIY miter saw stand, then used a Bessey clamp and a scrap piece of wood to create different stop blocks.
Next I adjusted the stop block to cut the sheet good down into squares. Since all these triangles are the same, I used a few pieces of tape to group them all together and cut them all at the same time at the bandsaw. These will be the gussets or braces for the connection at the feet to the legs.
To assemble I stuck the leg and foot pieces in my super jaws, used Titebond Original again, then predrilled and attached with screws.
Next I repeated to add on the gusset. Again, if you will want to break down your horses in the future then skip the wood glue. But if you plan to leave them assembled, then add wood glue.
Ok, and that’s the legs done….all six of them. So now to join them together.
This is done with a 2×4 connecting two legs together but note how this member doesn’t attach to the same side on the legs, it is mounted on opposite sides. While holding the board flush, I would use a one handed Bessey clamp to hold it in place so that I could move to the other side and get it in it’s position as well.
Now I could countersink and attach with screws.
Next the third leg can be attached by way of a hinge. Again, the important thing to pay attention to here is to make sure the top surfaces are in line with one another.
Oh….and to make sure the hinge is facing the correct way to make the horses fold the right direction. : )
The last thing to do on these horses is to add a top plate to just widen the tops surface area. On these I did skip the wood glue so that when these get eaten up by blades, they can easily be replaced. Again, make sure to counter sink all the screws here.
These will end up being the horses I pull out when I’m wanting to breakdown sheet goods. Since the angle can easily vary, it’s dead easy to support a wide board. It’s worth noting that these would always be great for a make shift work area. Throw a sheet good on top when needed, but then tuck away when work is over for the day.
Alrighty, then last one for this video is going to be a pretty standard fixed saw horse. This design has been around for ages but it’s a great one. These don’t fold, buuuuut they do stack.
This one has a 2x top but then 1x legs and support pieces.
Again, plans for all three DIY Sawhorse Plans are available here if you want them!
I started off by cutting the ends of my 2x top over at the miter saw, then taking it to my table saw and ripping both edges.
After cutting a corresponding miter on all four of the legs, I used some more Titebond and screws to attach them to the top.
This one doesn’t have a handle put in it, because the legs are set in slightly so that there is an overhang on both ends. This gives the user a very easy way to pick one up and move it.
While that feels good, the last thing to add are the gussets. I cheat when making stuff like this. I just held up a piece of board and traced both sides along the back. I used the miter saw to cut it to length and to this angle, then used glue and brad nails to attach it.
Ok and that finishes them off.
If you’re interested in building your own saw horses then I hope this has helped you out. Of course you can buy the light weight plastic or thin metal ones from the store, but the great thing about building the items you need is the ability to customize them for the task at hand. I love the ability to add in hinges, beef up the material, or make a set just as quickly as it would take to get to the store and back.

Don’t forget that you can purchase plans from me for these DIY Saw Horses here!
Check out the build video for even more details. And let me know down in the comments which design is your favorite, or if you have another unique option you created for a certain task!
And if you haven’t already, don’t forget to sign up at the top of this page for my newsletter so you don’t miss new projects!
(Most of the links listed above are affiliate links. As an Amazon Associate I earn from qualifying purchases. Thank you for supporting me in this way.)
One Response
All great designs! ????????????????????
Comments are closed.