Easy DIY Door Shelving Unit
- Storage DIY Projects
- April Wilkerson
- Updated: March 9, 2023
Thinking about building your own DIY door shelving unit? Check out this DIY project where I built and installed a shelf behind a door for extra storage!
Man, I was a busy bee this weekend. Just doing projects like crazy and it was great!
Since I have stacked my washer and dryer I have started to store my laundry soap and dryer sheets in a utility closet door I have in my laundry room (instead of the drawers that came with my set). This is a problem because the space is so tight that everything just kinda piles up after a while and turns into a mess. Solution? …Pinterest people. Pinterest is always the answer.
Inspiration:
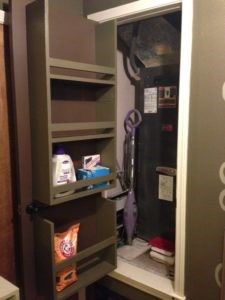
I ended up having to tweak it some, but not much. Instead of making mine one unit, I broke it up into two pieces in order to break up the weight (the sucker isn’t exactly light), and also because my door knob is the long lever kind and not the round knob kind so with two pieces it was easier to go around it’s path. Before:

After:

Before you get started!!
In case you are interested in my numbers: the top piece is 20″ wide, 41″ tall, and 7″ deep. I came in 3″ on the left, and 1″ from the top and right side, then 1 ¼” from the bottom.

3) Now since I planned to put extra dog/cat food on this shelf I wanted my support bar to be higher up so it will be holding in the middle of my (planned) tall containers. I cut a 1 ½” piece and did the same old routine: pilot hole first then follow with a wood screw. And there you go guys! One down.

5) Same steps apply for the top. Since I am using scrap pieces I had to ‘scab’ together two pieces in order to get the height for the sides. I grabbed two scab plates from Home Depot and after making the cuts, I used the plates to piece them together. You can see them in the below picture. After making the sides, I cut the bottom and screwed them together.

6) Next I cut the two shelves and screwed them into place as well. At this step I actually had my laundry soap (which is the tallest item) in the shop with me just to make sure that I would easily be able to get it in and out of the shelf. This helped determine where I would place the support bar as well.

7) I’m all about priming the wood early before spaces get too small. So next I primed.

8) I cut the support bars and stuck those guys in place.

My husband asked why I didn’t put tops on either of my pieces. I didn’t want to because it would add more weight and not any function. It would waste good wood I can use for another project. It would create something else to move around when putting something on or off the shelf. So…my answer was ‘I couldn’t think of a good why I should.’ If you don’t like the esthetics of it without the tops, then just cut you another piece and slap it on!
9) I threw some paint on both pieces and after they were dry, I took them inside to hang.
10) From Home Depot, I purchased a package of 4×4 inch right angle brackets to help support this bad mamma jamma. Since I only left an 1 ¼” on the bottom I used a vise and a hacksaw to cut two of the brackets on one side (so now it was a 1×4 inch bracket)(no I didn’t find any premade) then attached it to the unit first, then to the door next.

11) Now that the bottom was held in place, I went back to the top and at an angle, screwed in 2 ½” wood screws to secure the top of the unit to the door. Important: If you don’t drill pilot holes normally, that’s fine but when you are going in at an angle on an edge don’t skip the pilot hole!
12) Besides cutting the brackets, just repeat the mounting steps for the top and you’ll be done! After it was up, I went back through with some brown or green paint and painted the bracket to camo it into either the door or the shelving unit.
Now I just need to buy some containers so I can get it full!

2 Responses
You so fricking rock!
haha, thanks! : )
Comments are closed.