Simple DIY Paint Storage Cabinet
- Storage DIY Projects
- April Wilkerson
- Updated: March 8, 2023
Thinking about building a DIY paint storage cabinet? Check out this DIY project where I built a storage cabinet for my paint cans, with slide out drawers!
Every time I visit Home Depot (which is a bunch) I take a look at the Oops paint and pick up colors I like for 50 cents. Well, pile that on top of the fact that I already have a lot of paint and stain and poly containers, I just end up with an unorganized mess. I looked around online for how other people were storing their containers but really couldn’t find anything so I decided to design my own.
Check it out and let me know what you think!

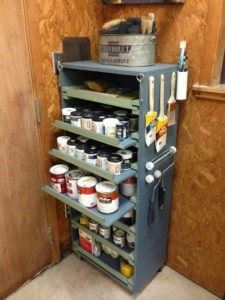
It measures to be 52″ tall with the casters on, is 21 1/2″ wide, and 12 1/2″ deep. The shelves for the small sample pots can hold 24 containers, while the shelves for the quarts can hold 8 each. So total I can store 32 quarts containers and 72 samples. …that’s a lot.
So pre-cabinet, I had all my paint stored in these boxes under my workbench….as you can see the cans are all piled on top of one another and I’m running out of room.
Then I also had this corner of my shop that was being used as a storage spot by my husband for things such as these rolls of rubber, a useless stool, and a vacuum attachment….(? Random). Anyways, so I moved said useless things out (meaning I shoved them in the attic) and started taking dimensions for a paint cabinet.
Note: I doubt anybody will need this detail buuut just in case….see that brown air vent on the wall in the corner? Well the vents are facing the wall with the window and since I planned on putting my cabinet there, I didn’t want to create a problem with air not being able to circulate so I took it off then just simply flipped it around so the vents now faced towards the open shop. Cool. Back to taking measurements.
Before I give you step by steps let me give you the general directions of my thoughts.
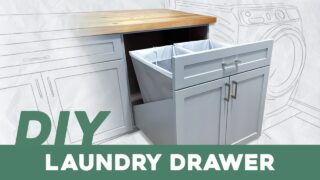
I wanted a cabinet where the paint would be in single layers so I could easily see all the colors on the lids, I also wanted it on casters and for the shelves to be on sliders. Well, knowing how much sliders cost from building my pantry I knew I wasn’t going to be able to afford sliders for a shop paint cabinet, so I used the same principal from my laundry basket holder and just modified it some so that if I only pulled the shelf out part ways without keeping a hold of it, it wouldn’t tump over. It might seem cheesy to some, but it was either this or no cabinet at all and at the end of the day…it does work. : )
Alright, lets get to those steps. Note: I had purchased a lot of cull wood for 50cents each almost a year ago and still had it sitting around, so I actually didn’t have to buy any wood for this project.
1) I grabbed 3/4″ plywood and used my table saw to make my cuts. I started by cutting the top and the bottom, then the sides. (Click on the photo to see the dimensions I used.) Then I used my Kreg Pocket Jig to join it all together.
2) After checking for square I cut the back piece from 1/4″ plywood then used my nail gun and 1″ nails to attach it to the frame.
3) To get ready to install the supports that would hold the shelves, I grabbed some 3/4″ pine and first cut the board down to 12 1/2″ long then cut 1 1/2″ wide strips. Since I wanted 7 shelves, I cut 28 strips total.
4) Next I started putting the supports in. I laid the first two down flush with the bottom and sides then used my nail gun and 2″ nails to attach them. Tip: After putting the support in it’s place use a clamp to clamp it to the frame’s wall so it won’t move when you shoot in your nail.
5) I planned on making my shelves out of 1/2″ wood but wanted a 3/4″ space for it to slide in and out. Instead of using a tape measure to line out where the next support needed to be placed, I grabbed a scrap piece of 3/4″ wood and used it as a spacer. So my bottom support is already in place, I would grab my spacer and place it on top then put my top support on top of that and nail it in place. Now repeat on the other side.
Note: I went ahead and threw in my shelf just to get a visual, but I will cover making the shelves later on.
Alright, let me pause and give you more of my thought process. With the amount of space I had, I figured that I would make four bottom shelves for the quart size containers and three upper shelves for the sample pot containers. After doing some measuring I needed 5″ for the quarts and 3 1/4″ for the pots.
6) To make things easier for me I made a spacer 5″ tall and would place it on the top support I just installed then while holding the support with one hand, I would use a square to transfer the line to the outside of the board so that I knew where to nail it.
7) Then I would ditch the square and use a clamp to hold the support in place while I went along my line with my nail gun and nailed the support in place with 2″ nails.
8) Once I finished my fourth quart size shelf slot I made a 3 1/4″ spacer and made the three remaining shelf slots.
9) With all 7 slots nailed in their place, I cut all the shelves out of 1/2″ plywood. The opening is actually 20 1/4″ wide, but I made my shelves 20″ so it would have some wiggle room. So they are 20″ wide and 12 1/2″ deep.
10) Next I cut 1″ strips to make a front lip on each shelf. Tip: I actually measured and cut these individually because each shelf is slightly different. Some were 17 1/4″ while another was 17″ 3/8″. Might not be a big deal to you, but I wanted to give you the heads up before making a bunch of cuts. I used 1 1/4″ nails to attach the lip to each shelf.
11) I purchased 90 lb casters (so 360 lbs total) from Walmart for $2 a piece and screwed them onto the bottom. I don’t recommend buying these, because they are kinda puny, but I’m on a tight budget so I’ll just have to upgrade later.
: D It looks pretty good I think!
12) Before I loaded her up I wanted to paint it. Ever since painting my pegboard grey and green, I decided to start painting more things that color combo and kinda make it the colors of my shop. So next I primed then painted.
WilkerDon’t: Since I made each shelf lip exact with it’s slot, I should have marked them before pulling them out and scattering them around to paint. But. I didn’t. So when it was time to put them back in I had to play shuffleboard a little until I matched each shelf with it’s slot. So, if you don’t make your lips a universal length, then make sure to learn from my mistake.
13) Once everything was dry I threw all my containers in and started adding accessories. I screwed in two screws onto the top left and right corners so I could hang paint keys.
14) I found some 1 1/2″ PVC and cut it down with a hacksaw then shoved some pool noodle in the bottom.
15) Then screwed it onto the side
And now I have a spot for my tiny brushes.
I will say that after painting the slider slots, the shelves don’t move as easily as they did unpainted, although it’s still fine (I’m just being picky). I will rub some grease on the slots to help it along. If you can afford sliders, then that would be an upgraded option. If you can’t, then this route definitely still works even if it’s a little simplistic. Like I said…for me it was either no paint cabinet or find a way to make it for almost nothing so all said and done I’m very happy with it!
….one more corner of my shop has just been funtionalized. (<– not a word, but I’m using it). : D
Total Time: 6 hrs
Total Cost: $9
If I add in the cost of the cull wood I bought originally it probably tacks on an additional $6.