13 Tape Measure Tips!
- Workshop DIY Projects
- April Wilkerson
- Updated: February 26, 2023
Here is a collection of Tape Measure Tips and Tricks that I personally find useful and worth sharing. You never know when you’re going to need
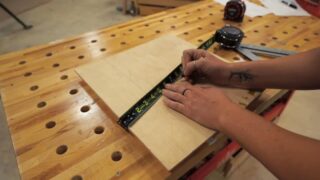
When trying to divide a board into equal sections, but the overall dimensions are not easy to divide, tilt your tape to a number that is easy to divide and then divide by the number of sections you are wanting.


Easy! Use an angle or change the size of the area you’re trying to measure!
I want 3 sections so I picked 15″ to divide by. Then I placed a mark at 5″ and 10″. Now I have 3 equal parts.
If I wanted 2 sections, I would tilt my tape to land on 14″ and mark at 7″ to find the center.
If you don’t need to be as precise as above, take the overall dimension – this case 14 11/16ths. Then get close on both sides such as marking 7″. Now you can narrow the filed to eyeball a close enough center.

You don’t always have to hook your tape. Burning an inch and then starting at the 1″ mark instead of 0 will give you a really precise measurement. Especially if you are in a situation where you can’t hook your tape. Just remember to subtract and inch from your final measurement.

When you have repeated measurements, instead of trying to remember them from board to board, use a dry erase marker to mark your tape. Then you can quickly mark all boards needed. After you are done, the mark can easily be wiped off.

It isn’t precise enough for fine furniture making, but in a lot of cases, using the edge of a tape is a great straight edge for quickly making lines.

When you are just needing something roughed in, the tape can also be used as a quick marking gauge. Use your left hand to determine the measurement and butting the tape up against the wood and then use a pencil against the end hook.

Remember that the end of your tape has a metal end hook. So, if you ever need to extend your reach to pick up something metal (such as the nut from your table saw), a magnet, stored on the side of your table saw, can quickly be placed on the end to pick something up.

It’s hard to accurately measure between on the inside of corners, such as the inside of this door jam. Instead of guessing, pull your tape from one side and mark an easy number such as 10.
Now measure to the other side from your mark and add 10 to that dimension.

It’s worth noting that this Lufkin Tape body is exactly 3″ long. In situations like this, you can pull your tape until your body is butting up to the other end and then add 3″ to that dimension.

Don’t have a notepad? Or a good memory? A small free sample of formica is a ready made table that just needs to be cut to size and stuck to your tape with either hot glue or double sided tape. Pencil marks can easily be wiped away for the next round of measurements.


Sometimes a tape isn’t the best method. There are plenty of times when holding a marking a board in place is not only the quickest but most accurate way to get a measurement.

I recently switched to using Lufkin tapes and one feature I am loving is using this through hole for marking curves or circles. You can place a nail through the body of the tape, then attach a pencil to the hook and it’s quick work to get a clean circle.

If you are using a tape without this feature, the alternative way would be to set a nail or screw and then hook the end of your tape. Then do your best to keep your pencil on the measurement ended. It’s doable but definitely not as easy.

Here’s two ways for determining square: If you only have two sides then the 3, 4, 5 method is easy. You measure to 3′ on one side, 4′ on the other side and then the hypotenuse (or the measurement from point to point) should be 5′ exactly. If it’s not, you can adjust. This also works with 6′, 8′ and 10′.

If you are building a box, the diagonals from corner to corner should be equal. If they aren’t, you an tap the long end until both measurements are the same.
Now, on a tape measure, I’ve always known that every foot is clearly marked, as well as every 16″ for doing framing on 16″ centers.
I recently learned that the small diamonds are for dividing an 8′ span into 5 equal parts. This is handy if you are trying to break down sheet goods.

Now let me talk about the sponsor of this video tutorial which is Lufkin Shockforce Tape Measures.

I thought all tapes were the same until I tried out these Lufkin Shockforce tapes. It is incredibly durable. I can withstand a 100′ drop and only produce a few scuffs. Everyone has two metal guardrails to protect the lock button and a diamond coated end hook for superior gripping.

Then, the tape itself is so rigid that it can repeatedly hold up to a 14′ stand off.

The Shockforce comes in two styles: the traditional coloring style but also a cool Nite Eye version. Both are extremely easy to read with larger than standard print for the numbers, a matte finish that prevents glare and also a contrast background on the foot markers.

I don’t typically work in dim lighting, but it is nice to know that if I were in an attack, a crawl space or on a poorly lit job-site, then the unique coloring of the Nite Eye would give me clear visibility. In fact, I think I even prefer this coloring vs the traditional.
I know I’m going on about a tape measure, but the thoughtful design behind this one makes it worth it. After all, it is everybody’s most used tool.
One last feature I love that I want to point out is the double side tape. The backside has vertical markings that are easy to read when pulling from the ground.

Hopefully you can put some of these tricks to use in your own shop and if I left any of your favorite out then please leave it for me in the comments down below.
I’ll see you soon.
4 Responses
I learned a procedure for cutting drywall while working with Habitat for Humanity. Either lock the tape blade at the proper dimension, or use your thumb and forefinger to lock the dimension. Then with the other hand, Hold the blade of the utility knife against the hook of the tape. With the tape body, or using your thumb and forefinger as a guide along the edge of the board you can draw the utility blade parallel to the edge as you score the board.
????????????????????????
Noticed the first tip: trying to divide odd fractional numbers into halves and thirds etc. As a once- GED teacher, I noted that fractions are only used in cooking and carpentry as the mainstay of measurement. And so many people just struggle with dealing with them. Another tip not mentioned is to switch to the metric system, just using millimeter and centimeter. You’ll quickly see why engineers prefer this to the fractional measurement US system. I suspect Lufkin makes a tape with both scales on it.
Another way to use tape measure. When out take tape and measure 158”, now gently fold tape in half for the answer
Comments are closed.