Easy DIY Can Rack Dispenser Rotator 1
- Storage DIY Projects
- April Wilkerson
- Updated: March 9, 2023
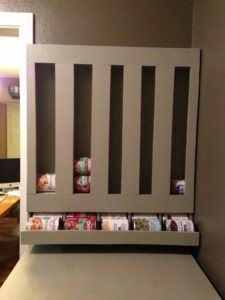
Thinking about building your own DIY can rack? Check out this DIY project where I built a can rack that dispenses and rotates your cans!
Ok guys, I’m saying this up front so there is no surprise….I forgot to take photos along the way on this build. I got so excited that it was turning out right, that I just kept going and forgot to pause to capture the steps! Sorry in advance. I shall do better in the future.
The Inspiration:

Looking at all the different designs of the can rack rotators out there, I actually liked the horizontal orientation ones better but I only had one potential spot to hang this and the spot would be best utilized by the vertical design. So forward I went.Where I found this particular picture, they did provide free PDF plans for a can rack rotator (In case you are interested, but their plans are not for this picture. So, I basically took this picture out to the shop with me, and used it as a guide.
1) I measured the wall space I had the rack planned for, and cut the back. In the photo, it looks like they use 3/4 MDF. I still had that 1/2 plywood I purchased for $0.51 a sheet, so I decided to use that.
2) Next I took some cans my family uses the most of and laid them out on the board to see which combination would allow for the most rows. It turned out that for my 28 inch wide board three condiment can rows (corn, green beans, etc.) and two soup can rows would be the best use of the space. I cut dividers making sure to leave enough room for one can to be exposed at all time there at the bottom, then glued and nailed them on the back piece.

3) Since I wanted my finish product to be painted, next I primed and painted everything before putting the face pieces on. If you wait until the end, it will just be more difficult to get all the spots.
4) While it was drying, I went ahead and started cutting the face pieces. Two horizontal and six vertical. Since I don’t have any photos of this step, here is the finish product so you can see what I’m explaining…
5) Now I cut the footers you see holding the cans. I made the bottom deep enough so a can will be fully exposed (allowing you room to grab it), and then I made the vertical footer, which stops the cans, tall enough to come half way up the tallest can which happen to be my soup cans.
6) Before adding these front pieces to the build, I sanded then primed and painted them. It is important that if you use plywood to sand these parts smooth since they might come in contact with hands. Nothing worse than splinters (in my opinion).
7) After these boards were dry, I glued then nailed them on in place and then took some time to do a big happy dance!
However, I stopped dancing when I tried it out and it didn’t work. The cans were putting so much downward weight on the bottom can that it couldn’t roll forward. The solution? I needed wedges. Something that would allow the can to roll forward onto the footer. So I stuck a 2×4 in my vise and
created five wedges that I then nailed into place. (see above photo)
8) Mounting it on the wall came next, and keeping in mind that this thing was going to be holding a bunch of weight I took out stud finder and located and marked all the studs.
9) Went back to my scrap wood and cut three horizontal boards then screwed them into place, putting two screws into each stud.


Guess I can go and grab more cans since I now have the room for them!

I plan on making another smaller one for the right side of the wall there, right above the light switch. It will hold smaller cans such as cream of mushroom or chicken.
Total Time: A weekend
Total Cost: $7 (since I used the plywood I had laying around)
**Update**
Since building this can rack, I went on to build a second soup can rack and put together a much better tutorial.