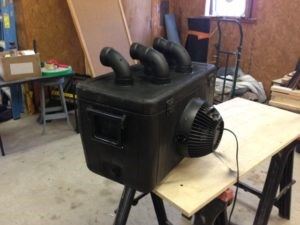
Easy DIY AC Ice Chest
- Workshop DIY Projects
- April Wilkerson
- Updated: March 9, 2023
Thinking about building your own DIY AC ice chest? Check out this easy DIY project where I built a portable AC unit using an old ice chest!
Ok ok ok, before you say it, I know this is a little bit hillbilly, but at the end of the day this sucker works and I am all the more thankful for it in this Texas heat. And for the ladies reading this, this is a great man present. My husband works on cars in his spare time and my dad practically lives in his garage; I made them both one for Christmas last year and they loved it and both use the crap out of it. The air coming out of this thing is around 58-62 degrees and can last for around 5 hours.


The concept is you fill the ice chest full of ice (I use frozen milk jugs) then turn the fan on and cold air blows out the top exhaust pipes. ….: D It isn’t the prettiest thing in the world, but when I’m sweating my butt off and the cold air hits me, I don’t seem to care anymore!
Here are the steps if you want to make one.
Note: 5 hours is the time span if you use a big block of ice like a milk jug. If you use loose ice, then it only last about 2-3 hours. The bigger you can get your blocks of ice, the longer it will last. Another alternative to milk jugs is using the inside bladder to box wine. <–Good excuse to drink some wine this weekend. ; )
1) I went to Goodwill and found a couple of coolers for around $5 a piece. If you plan to use regular ice instead of freezing water in milk jugs, then make sure you buy one with a drain plug.
2) I found the fan at Home Depot for $15 as well as the PVC parts. Incase you aren’t familiar with the different joints, these are made of 2″ male adapters and 2″ 90 degree street elbows.

3) Take the ice chest and figure out where you want the exhaust pipes to go. Then take the male adapter and trace it on the lid so you know where to cut.
Tip: If you are using 2″ PVC then make at least 5 pipes. I first made mine with only 3 and unless you were right up close to it, you couldn’t feel the air coming out. That makes the thing pretty pointless, so make at least 5 unless you are using larger pipes. Another option would be to use a stronger fan, but then you are looking at spending closer to $60 on the fan alone.
4) Now take the fan and trace it on the backside of the ice chest.
5) To cut out all the holes I first took a drill and made a hole in the center of all the circles, then used a jigsaw to make all the cuts.
At this point you should have the smaller holes on the lid for the pipes and the large hole in the back for the fan. After making each cut, you can take the item (either the fan or the PVC) and make sure they fit. If not, just keep whittling away material until they do. If you end up cutting the hole a little too big, that’s ok because we fill it in the next step anyways.
6) I placed each PVC pipe in it’s place then used some caulk to fill in the base.


7) Wait until it’s dry, then lay the chest on it’s face and caulk in the fan.

Since I was going to spray paint mine, I wasn’t worry about making it pretty.
8) I grabbed a can of $1 black spray paint, and gave everything a good coat. (I used a spare piece of cardboard to not get any on the fan)
9) The last thing I did was take the base off the fan since it wasn’t going to be needed. I used a box blade to pop off the side caps, then a screw driver to take out the center bolt holding it together.


Voila! Now I have a portable AC unit I can use when I’m working out in the shop.
It is not ideal for all situations but I can see it being useful if you have an outlet near by. With 5 pipes I can stand about 5 feet away and feel the air hitting me.
The next one I am going to make will be with a 12 volt fan that can be ran off a 12 volt battery, that way I can take it camping and sleep comfortably without needing an outlet to power it. I’ll post instructions on that build once I get it done.
Stay cool!
Total Cost: $30
Total Time: 1 hr