DIY Drilling Rig Halloween Costume
- Home Decor DIY Projects
- April Wilkerson
- Updated: March 9, 2023

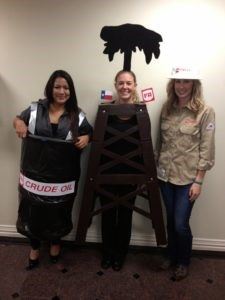
I don’t have steps for the barrel outfit since Gidget made her own but here are the steps if (for the off chance) you want to make a wearable rig costume with oil spilling out of your head….
1) I looked around and gathered supplies. I grabbed 4 boxes from long light bulbs, a lid from a printer’s paper box, and a lid from another random box I found lying around. The key I was looking for in sizes is a rectangle one that would be able to fit around my waist and a square one that would fit around my head. You don’t want the same size because you need it to taper out. Also, the way this thing stays on is by resting on my shoulders and not my waist.
2) I cut a hole just big enough for my head to fit through on the square lid, and almost all of the top from the rectangle one, then laid everything out and gave it a good coating of brown spray paint.
It turned out that the boxes were the perfect length and I didn’t need to shorten them.
5) Now I grabbed an extra box lid and cut strips to make the cross members then used duct tape to hold them in place.
6) I moved the rig outside and gave the cross members and duck tape a good spray down with the brown paint. I avoided painting the hardware because I wanted to silver to really stand out.
: ) I’m still laughing. Ok ok….so the rig was done and now I needed oil to really top it off.
7) For the oil I actually grabbed a beer box since it was nice and thin then drew out what I thought to be ‘oil coming out of a derrick’ shape. I cut it out using a box blade then spray painted it black. I left just enough extra cardboard at the base to make a 90 degree angle then use hot glue to stick it to a black headband.
8) At this point everything was looking good except it was having trouble staying straight up. It had a slight lean to it since it was so top heavy. To fix this problem I grabbed a black coat hanger from my closest and used a pair of side cutter to cut two lengths just as long as the stem of my oil. Then I used my hot glue gun again to stick them on the front of my oil stem (both on the right and left side). This gave it enough support to stand tall.


To make the flags I grabbed two paperclips and straighten them out, then I printed off the Texas flag and my company logo and used tape to attached them in place.
: D This build was so much fun. It was simple and everybody loved it.