Easy DIY Thanksgiving Decorations
- Home Decor DIY Projects
- April Wilkerson
- Updated: March 8, 2023
Thinking about making some DIY Thanksgiving decorations? Check out these DIY projects where I built cool Thanksgiving decorations all by myself!
Before I show you the goods I just want to say how hard it is to decorate for Thanksgiving! Halloween and Christmas seem like such a snap compared to it so I really struggled with this one. None the less, I was able to make a few things and wrote out the steps for you below. Enjoy!

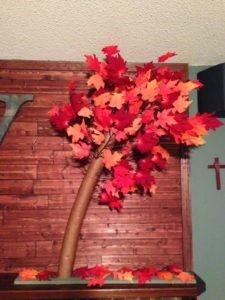
I love fall leaves and was determined to use them in my decorations. But. I live in Texas and right now everything is still green….eh. So plan B was to simply buy fall leaves. Hobby Lobby was having a 50% off sale on their fall items so I bought 4 bundles and headed home to think of what I was going to do with them. My mind quickly went to how cool it would be to make a tree (nobody who knows me is surprised) so then I just went on trying to figure out how I was going to do it…..
Tip: Don’t always start on the same side. Vary your standing position as you are laying down the paper and it will make it look more random.
4) After everything yellow was covered, I went over the whole thing with a foam brush and some matte modge podge. (Elmer’s glue would be a fine substitute) Not only to make the color slightly darker, but to also hold all those ends down permanently.
5) Now I just started adding branches. I used the center hole of the pool noodle to hold a whole bundle, but then after that I used side cutters to cut off the individual branches and just started sticking them in where I thought they would look nice. This is not difficult, but if you have problems then try sticking a sharpened pencil in first then follow with your branch. It took three bundles to make this.
6) Paint the base then glue some leaves onto it as well, and you’re done! You now have a fall tree.
*Update* Ok so I stored my tree over night on my fire place mantle to keep it away from my adventurous cat but obviously that wasn’t a good enough place because I woke up the next morning with it on the floor and the tree was coming off the base. Grrrr.
7) I finished uprooting the tree from the base completely and used a putty knife to scrap all the hot glue off. Then I found some 1/2″ PVC I had and shoved it in the middle of the noddle. Note: I cut it where I only had about a foot in the noddle. I didn’t want the curve of the tree to be taken out completely.
8) Next I grabbed a 3/4″ paddle bit and drilled a hole in the middle of the base then used my hammer to persuade the PVC to go in the hole. ; ) You want it flush with the bottom of the board. Since I had a snug hole I didn’t bother gluing the pipe in.
Tips: Don’t worry if your paper ‘bark’ gets ripped. You can just tear a new piece and glued it right over it. If anything, it just adds texture. Also, don’t be afraid to glue the branches in their holes you put them in so they will stay pointed in the direction you want them.
Total Time: 2 hrs
Total Cost: $18
PS: If you live somewhere where the leaves change colors then make this project cost $0 by just rounding up real leaves and preserving them with modge podge or beeswax.

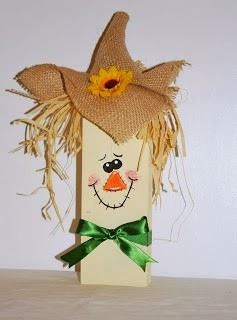
1) I grabbed two scrap 2x4s I had in my wood pile and first painted them a tan color, then painted on the faces.
2) Then I grabbed the bandannas (Dollar Tree) and played with different lengths until I liked it, then cut and hot glued them in place.
3) Next, I cut a small piece of burlap and started to shape the hat.
For the man’s: In order to do this, I just put it over something slightly pointy (my wood glue bottle) and then held it with my fingers and moved it to my 2×4.
Please excuse her face in this photo…I know she looks sloshed. That was my first attempt at painting flirty eyes. : D If you make your scarecrow look like they have been drinking on the job, then just paint over that section and try again.
5) After I was finished working on the hat, I also glued random bits of straw to the forehead and temples then also on the underside of the hat. I believe you can buy hay/straw but I actually got mine from working with project number 4 below.
6) Hot Glue on your flowers. Make a small bow for your lady. Then you should be done!
Total Time: 30 mins
Total Cost: $2
3) Burlap Banner
Inspiration:
1) Since I could see through my burlap, I cut rectangles then folded them over and glued the top and bottom to create my banner pieces.
2) Then I pulled out my stencils and brown paint
3) Now, since I did the whole double over thing, I didn’t want to just lay the stencil down and paint because then if the material was adjusted at all, the paint that got on the back layer would mess up the look of the letter…so before painting I would slip a small piece of cardboard in the poach and then paint.
4) Pretty cute, but a little plain so I went back through and just brushed on a boarder.
5) Then last step was to thread some twine through so I had a way to hang them. Tip: Stick a pencil through your hole first to open it up then follow with the twine.
Total Time: 30 mins
Total Cost: $3
4) Fall Sign
Inspiration:
Ooooh…how very Fall-ish. I had to make one. My way is a little different but both ways give you fall signage for cheap. ; )
Here is mine:
1) I found a few pine scrap 1xs (<– that means one bys) (<– that means any piece that is 1 inch thick. 1×4; 1×6 etc) and cut then all to 9″ tall, then cut sixteen 1 3/4″ strips.
2) Now I took four pieces and used wood glue to glue them together. I would use my quick grip Irwin clamps to hold them together until the glue was dried.
3) I first painted them orange then after it was dry, I quickly brushed on a little brown stain then wiped it right off. This took it from over the top orange, to a nice fall orange.
Now I was at Hobby Lobby and their letters were not on sale so I just decided to make my own.
4) To make my own letters, I drew them out on some scrap 1/4″ wood to where they were 6″ tall, then used my Dremel Moto-Saw (such a great tool) to cut them out. If you don’t have a scroll saw, then just take your time and use a jigsaw.
Note: The letters are not attached at this point.
5) Next I sanded then painted them. While they were drying, I grabbed my burlap roll again and cut a strip then hot glued it in place at the top.
6) Then I glued on the painted letter and a few of these leaves. You can buy a package of 20 leaves at the Dollar Tree.
Total Time: 1.5 hrs
Total Cost: $1
5) Hay Bushels:
Alright, so these didn’t turn out as great as I hoped but they’re alright. In a perfect world, I would have bought a few bundles and really made them great. But! I’m working on a budget and each bundle was $7, so I just purchased one and split it in two.
1) Cut the stock to however high you want then use regular Scotch Tape to keep it together.
2) Now wrap a ribbon to hide the tape and tie a pretty bow.

Total Time: 10 mins
Total Cost: $9
Well that’s it for now. I’ll probably keep adding to this post whenever I think of something new to make, so keep checking back.
Happy Thanksgiving everyone!