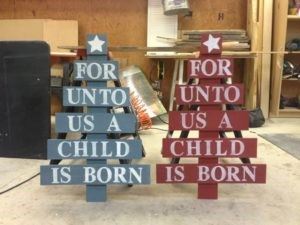
Easy DIY Savior Christmas Tree
- Home Decor DIY Projects
- April Wilkerson
- Updated: March 8, 2023
Thinking about building a DIY savior Christmas tree? Check out this easy DIY project where I used scrap wood to build a couple of Christmas tree decorations!
Anybody who has been on Pinterest lately will have seen the inspiration for my latest project. I think it is being called the “For Unto Us a Child is Born Wooden Christmas Tree” but it seemed a tad long for a post’s title….; )
My girlfriend sent me a text asking me to make her a red one, then my mom wanted a blue/grey one. Here are the steps so you can make your own instead of paying $50 -$75.

1) (like always) I grabbed a bunch of scraps from my wood pile. I stuck to 1/2″ plywood and started by cutting 4″ strips.2) Then I brought out my 3″ stencils and played around until I figured out how long I needed each board to not only hold the correct amount of letters, but to also make up the Christmas Tree shape, then I made the cuts needed with my table saw.
If you want to put this in your yard, then just grab another piece of scrap wood and cut it to a point on one end to create your own stake. Then attach it to the backside of the tree’s trunk so that when you put it in the ground, the trunk will look like it’s resting on the ground.Or, if you want to hang it on the wall, just put a picture frame hook on the back and throw it up somewhere!
If you don’t have any scrap wood, then look around for pallet wood, or fence panels or even cull wood at Home Depot/Lowes. You can buy cull wood for 50 cents and with a project like this, it won’t matter if the pieces are a little warped. The more beat up the wood, the more rustic it will turn out so don’t pass up that pile sitting on somebody’s curb. ; )
