How To Build A DIY Chop Saw Station
- Workshop DIY Projects
- April Wilkerson
- Updated: March 4, 2023
Thinking about building your very own chop saw station? Check out this awesome DIY project where I built a quick DIY chop saw station!
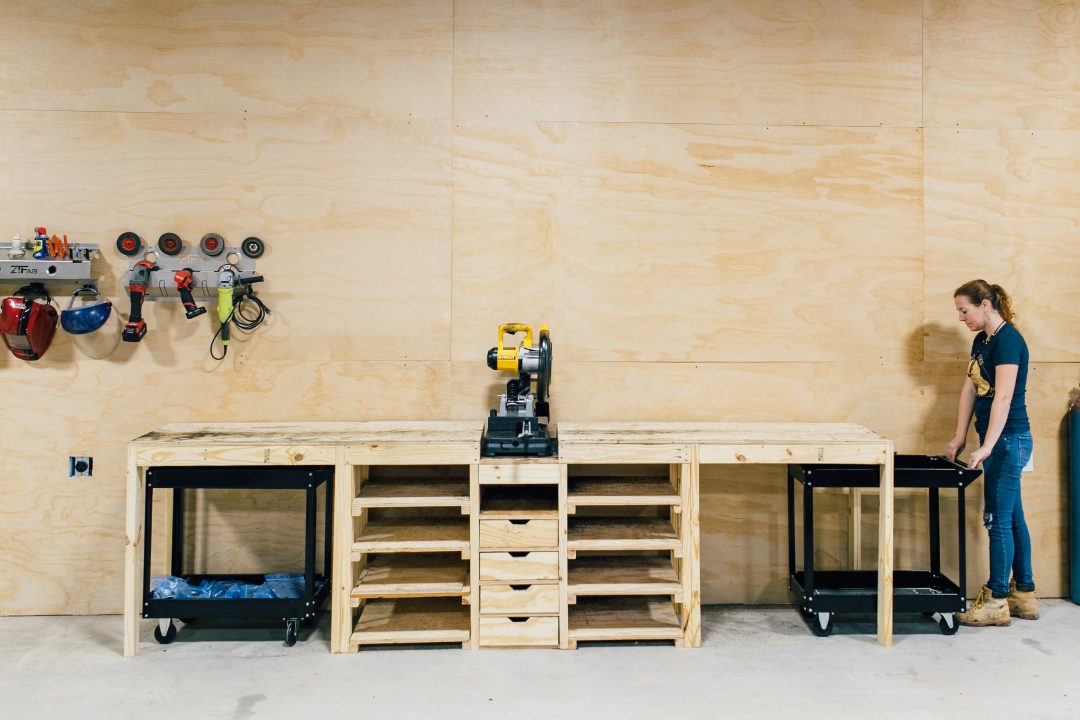
I’ll go ahead and give you the spoiler that while I came really close to finishing this project in a single day, it did drag over into two. This is what I ended up with.


Each wing support is 5’ long to give me a total span that is very supportive for these extra long joints of steel. To utilize the space under, I added in two spaces large enough to house carts that can be stored away easily but also pulled out to use in the shop.
Then also a section with plenty of shelf storage for cut offs or other items to keep on hand. And even a section with a few drawers.
Now keep in mind that even though I built this for my metal shop, you can very easily take the plan and build it for a woodworking shop. If you’re interested I do have a set of plans with a cut list and material list here.
The entire body of the station is made up from 2x4s and I started this project off much like I start many of my others, by flipping out the wings on my miter saw stand and cutting my boards to length on my miter saw.
Any time I make repeatable cuts, I always grab a scrap and clamp it to my wing to act as a stop block. If you do this make sure you hold the portion of the board between this stop block and the blade as that’s the portion that has a chance of binding.
Once I had all my parts cuts, I started assembling. You can see that I’m using my SuperJaws to help hold a board in place while I attach other boards to the ends.
For this entire project I’m using Titebond original wood glue since it will be indoors. I also predrilled everything to prevent splitting and to nicely countersink all the screw heads.
As mentioned before, the out most wing portion of the project will store carts under it. Having a rolling cart around a shop is extremely useful and I actually purchased my two carts before designing this build so that I could make sure they would fit. However, another option would be to build your own cart. Oooooor I even love the idea of having two flat top rolling workbenches with some shelving underneath. Actually, I might have to come back and build those as they sounds useful. Then they can be used for a variety of different things….a workbench, an outfeed for a tablesaw, or side support for a drill press stand….but then when you are done, you tuck them away. Anyway, just food for thought.
After completing the assembly for the side portions, I start cutting to length the boards needed for the center section. Now when it comes to shop projects, I’m not too picky about trying to hid screws, especially not when I’m trying to knock out something quick in a day. So that’s the majority of my boards have exposed screws, but note another option would be to use a pocket hole jig. This would give you the same results but with hidden screws.
On these inside legs, I doubled up on the 2x4s to give it more strength and you can see that I cut them short so that I have room to fit in cross members in the next step which will ultimately connect the two sides together.
I’m using one of these quick clamps that ratchet from Bessey and they make moving a clamp along the work piece quick and easy. It’s important to clamp boards together so they will seat properly. If you just try to hold it in place, you’ll often get a gap when the screw goes through the first piece and enters into the second.
Then I continued building onto the assembly with more cross members and legs.
Alrighty, now before joining these two sides together permanently, I took the opportunity to move the unit into my other shop while they were still manageable sized pieces. I haven’t fully thought about the layout of my metal working shop so I’m not sure if I’ll end up keeping this unit at all, much less keeping it up against this wall. But! For the mean time, I positioned it against this wall where I would have an outlet close enough for my saw to reach then joined the two parts together.
With the body and framing done, I now start outfitting each section. Keep in mind that all of this is customizable. If you’re a fan of drawers, then all of these sections can be drawers. If you hate drawers, then they can all be shelves. I started by ripping a few 2x4s down at my table saw to make some runners to create my shelves. Then taking them over to the unit and connecting them to the sections I intended for shelves.
To make this step easier cut two scraps to length and used them as spacers to quickly place in between each level. If I do end up using these shelves for cut off then they will be holding a good amount of weight so I’m using wood glue as well as screws to connect these.
Next I grab a sheet of construction grade plywood and first used my track saw to cut it down to manageable size pieces.
Then I took those bigger pieces to my table saw and ripped them down to the size of my shelves. These shelves are simply laid onto of the runners then screwed down. I skipped the glue on this step just in case I ever needed to replace a shelf.
Man that is actually starting to look like something! Since I was already ripping down plywood I went ahead and cut out the wing tops. These are two pieces of ply that span the wings and I again skipped the glue in case these ever need to be replaced. I did however go around the edge and place a few screws to hold it in place.
Same process for the center section holding the saw. Of course I made my dimensions for this section based on my saw, so if you replicate it make sure you have your saw picked out first then just adjust the size here.
Moving just below there to the area I wanted drawers. I first cut a few more pieces of plywood then drilled in a few pocket holes to give myself a way to attach them. I divided the space up evenly then started attaching them, once again using a few spacers to make this job go quick.
And that’s actually as far as I got in the first day. Which isn’t half bad if you ask me! I went ahead and placed my chop saw in the center and moved in my carts.
I used a straight edge, a level in my case, to get the deck of the saw tuned into the level of the wings. Mine was just slightly under so I shimmed it up with a piece of masonite under the front and back legs.
The next day I only had to finish making the drawers. Which consisted of cutting down more plywood then gluing and nailing them together. I cut in some simple handles with my band saw so they can easily be pulled out of their spaces, then fitted them into the unit.
Alrighty and the last thing I did was throw on a coat of finish on the wings. I don’t normally seal or coat shop furniture but since this is going to be in contact with a bunch of dirty steel I decided to put on a clear coat of General Finishes High Performance Top Coat.
This has a urethane that will harden and make the surfaces of the these wings much more durable than if I were to leave them raw. It will also allow me to very quickly wipe down the wings if I have something clean to cut that I don’t want getting dirty. You can apply this finish with just about anything but I had a foam bush on hand so that’s what I used to spread the finish out.
Now let me try and head off the two biggest comments I can already see coming.
One: this is a wooden unit, placed up again a wooden wall but it will be for a metal cutting chop saw which is always associated with lots and lots of sparks. People will probably tell me I’ll burn up my wall if I don’t sheet it in metal. Well I’m actually running a blade put out by Diablo that is brand new technology called a Crement blade and one of it’s features is that it produces little to no sparks when cutting metal. Annnnd it also produces such little heat that I can actually pick up a piece I just cut and it isn’t even hot.
It’s pretty incredible. But please note that even with this new tech I still am always conscious of watching for fires, I have plenty of extinguishers on hand, and I even follow a common metal working rule where I don’t leave my shop for a full hour after using any equipment that produces sparks.
Then the second comment I see coming on this project is that I didn’t leave room to make angled cuts. And to be honest, when I was designing this I didn’t even think about it because unlike a normal miter saw that has a table that moves to create an angle, this is a chop saw and has a swiveling fence. But the problem here is even though I can still swivel the fence to the angle needed, my material will run into my wall.
A solution is I could move it off the wall to create space on the back side, but I would still lose all support of my long wings. So the ultimate solution would be to leave this center section wide enough so I could rotate the entire saw to make angled cuts while keeping my material on my wings.
To get around the problem for the mean time, I ended up placing the saw on the wings, and then creating two stand offs for the wings to make up the height difference. This worked like a champ so even though I overlooked a design flaw, it still did exactly what I needed it to do which was support my material while I cut it.
And that’s it! Keep in mind that while this is quick and easy, it isn’t absolutely perfect and polished, but it definitely serves the purpose that I was needing. And that purpose is to tide me over in the short term until I can build something more suitable for the future. There is nothing wrong with throwing together something quick until you have more time to develop or build exactly what you need.

Don’t forget that I have a set of plans for this project, chop saw station plans here. And I’ll see you on the next project.
(Most of the product links listed above are affiliate links. As an Amazon Associate I earn from qualifying purchases. Thank you!)